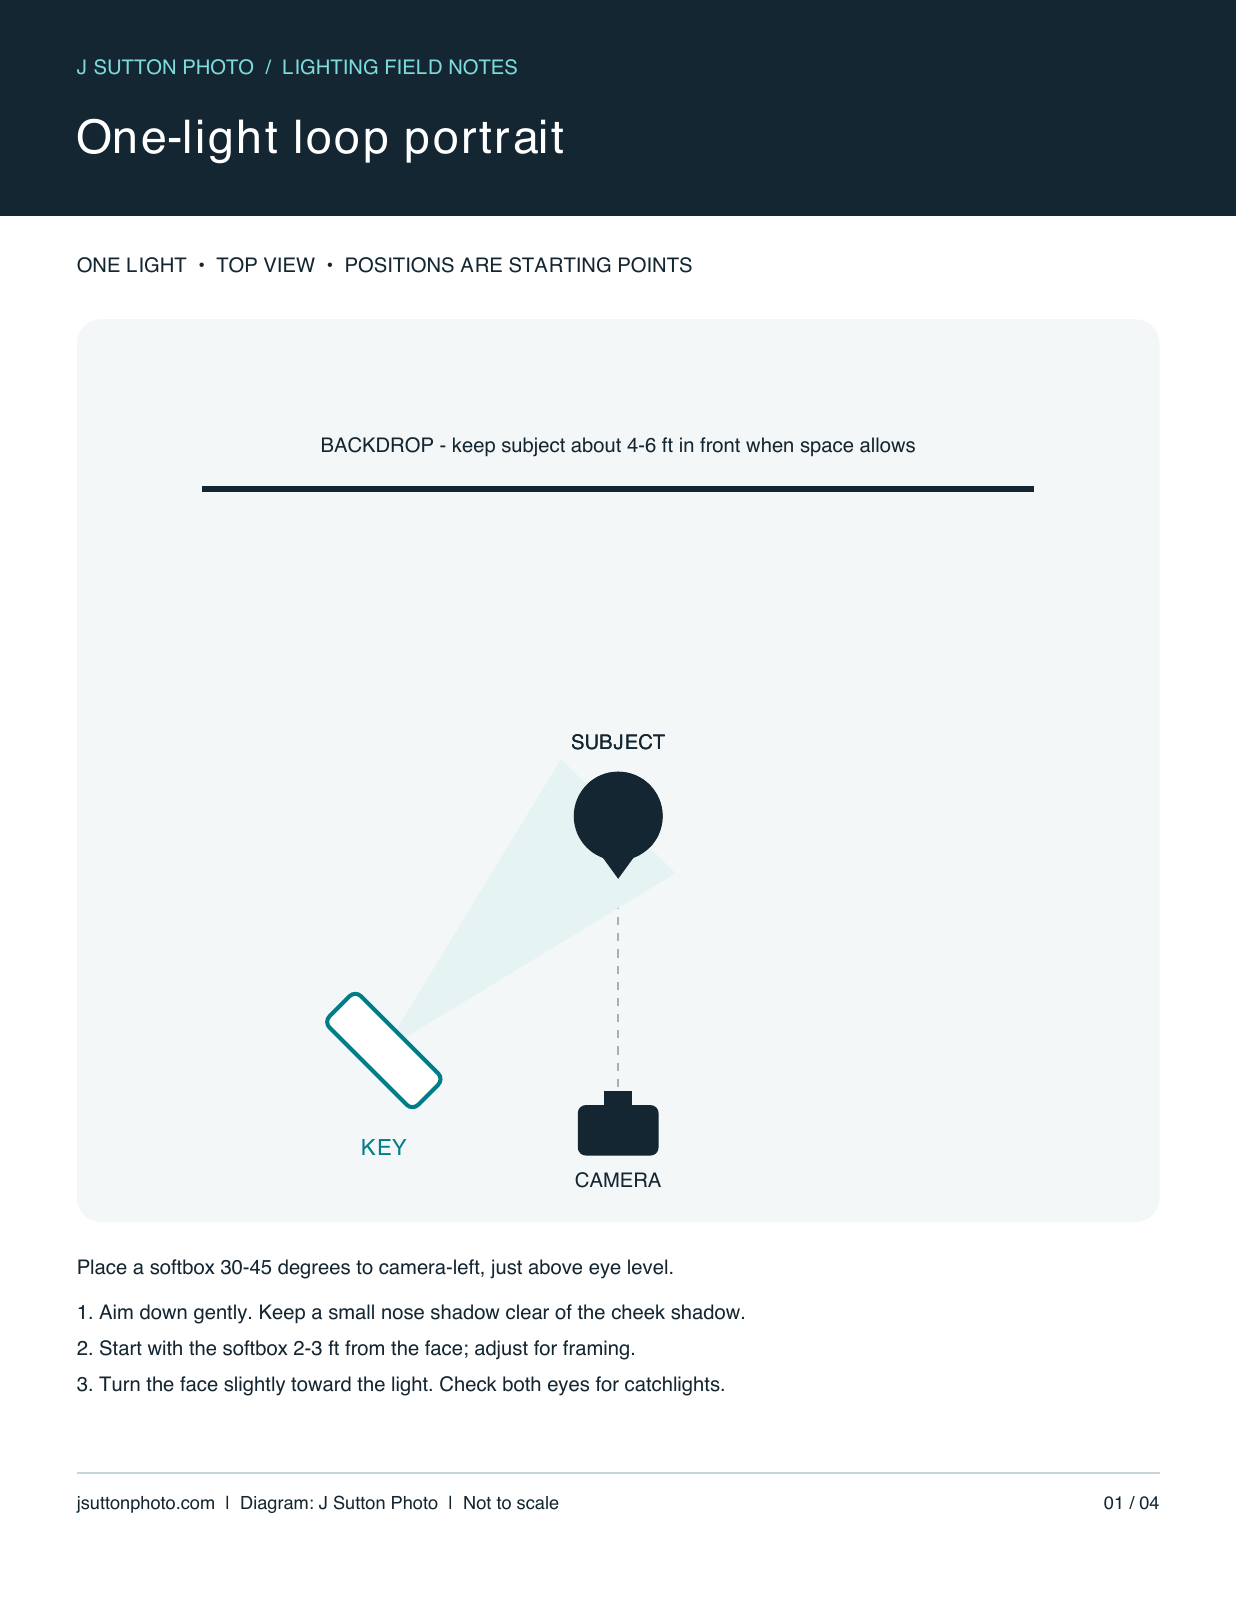
For a simple one-light portrait, place a softbox about 30-45 degrees to one side of the camera and slightly above your subject’s eyes. Aim it down gently and adjust until the nose casts a small shadow that stays separate from the cheek shadow. That is loop lighting: a useful starting point for headshots and portraits with shape, softness, and an approachable feel.
This is lesson one in a four-part lighting series from J Sutton Photo. Start with one light, learn to read its shadows, and then add a second light with a specific purpose.
Download the lighting diagram

Download the printable lighting diagram (PDF) · Download the diagram image (PNG)
Portrait reference: what to look for

What you need
- One flash or strobe with a compatible trigger.
- A softbox or umbrella, a stable stand, and a sandbag.
- A camera with manual exposure and a simple background.
- Enough space to move the light without blocking your framing.
A medium softbox is an easy choice. Its apparent size from the subject’s position controls softness: bringing it closer usually gives a gentler shadow transition. The modifier does not have to be expensive to teach you how light behaves.
Set up the light, step by step
- Position the subject. When space allows, start about 4-6 feet from the background. This gives you more room to control spill and background shadows.
- Place the key light. Start 30-45 degrees to camera-left and roughly 2-3 feet from the face, while keeping the modifier out of frame. Raise it just above eye level.
- Set exposure. For a flash-only starting test, try ISO 100, f/5.6, and a shutter speed at or below your camera’s normal flash-sync speed. These are starting settings, not a required recipe. Set flash output for the chosen aperture.
- Check ambient light. Take a frame with the flash off. If you want the flash to dominate, reduce unwanted room light until that test frame is dark enough for your intention.
- Read the face. Look for a small nose shadow, visible eyes, and a smooth transition across the cheek. Move the light a few inches at a time.
How to fix common problems
The portrait looks flat: move the light farther to the side, then check the shadow again. The eyes look dark: lower the light slightly or adjust its downward angle. The nose shadow joins the cheek: bring the light closer to the camera axis; you are moving toward a different pattern. The background shadow is distracting: increase subject-to-background distance or redirect spill.
If the shadow side is too dark, first consider your room. A white wall may already be filling shadows; a dark room may not. A white reflector can lift that side without adding a second powered light. Keep the reflector optional while you learn what the key does on its own.
Practice: change one thing
Make three frames with the same exposure and pose: key near the camera, key at roughly 30 degrees, and key around 45 degrees. Compare the nose shadow and cheek shape. Then keep your favorite angle and move the softbox closer, resetting power to preserve exposure. You will see the difference between direction and softness.
One-light portrait questions
Can I use a speedlight?
Yes. A speedlight can make this pattern through a suitable modifier. Available power, recycle time, and modifier efficiency determine your working aperture and pace.
Does loop lighting work for every face?
It is a starting point. Face shape, head angle, glasses, and expression can all change where the shadows fall. Adjust for the person, rather than forcing an exact angle.
Explore professional headshot photography in San Diego or portrait sessions to see how controlled lighting supports different goals.