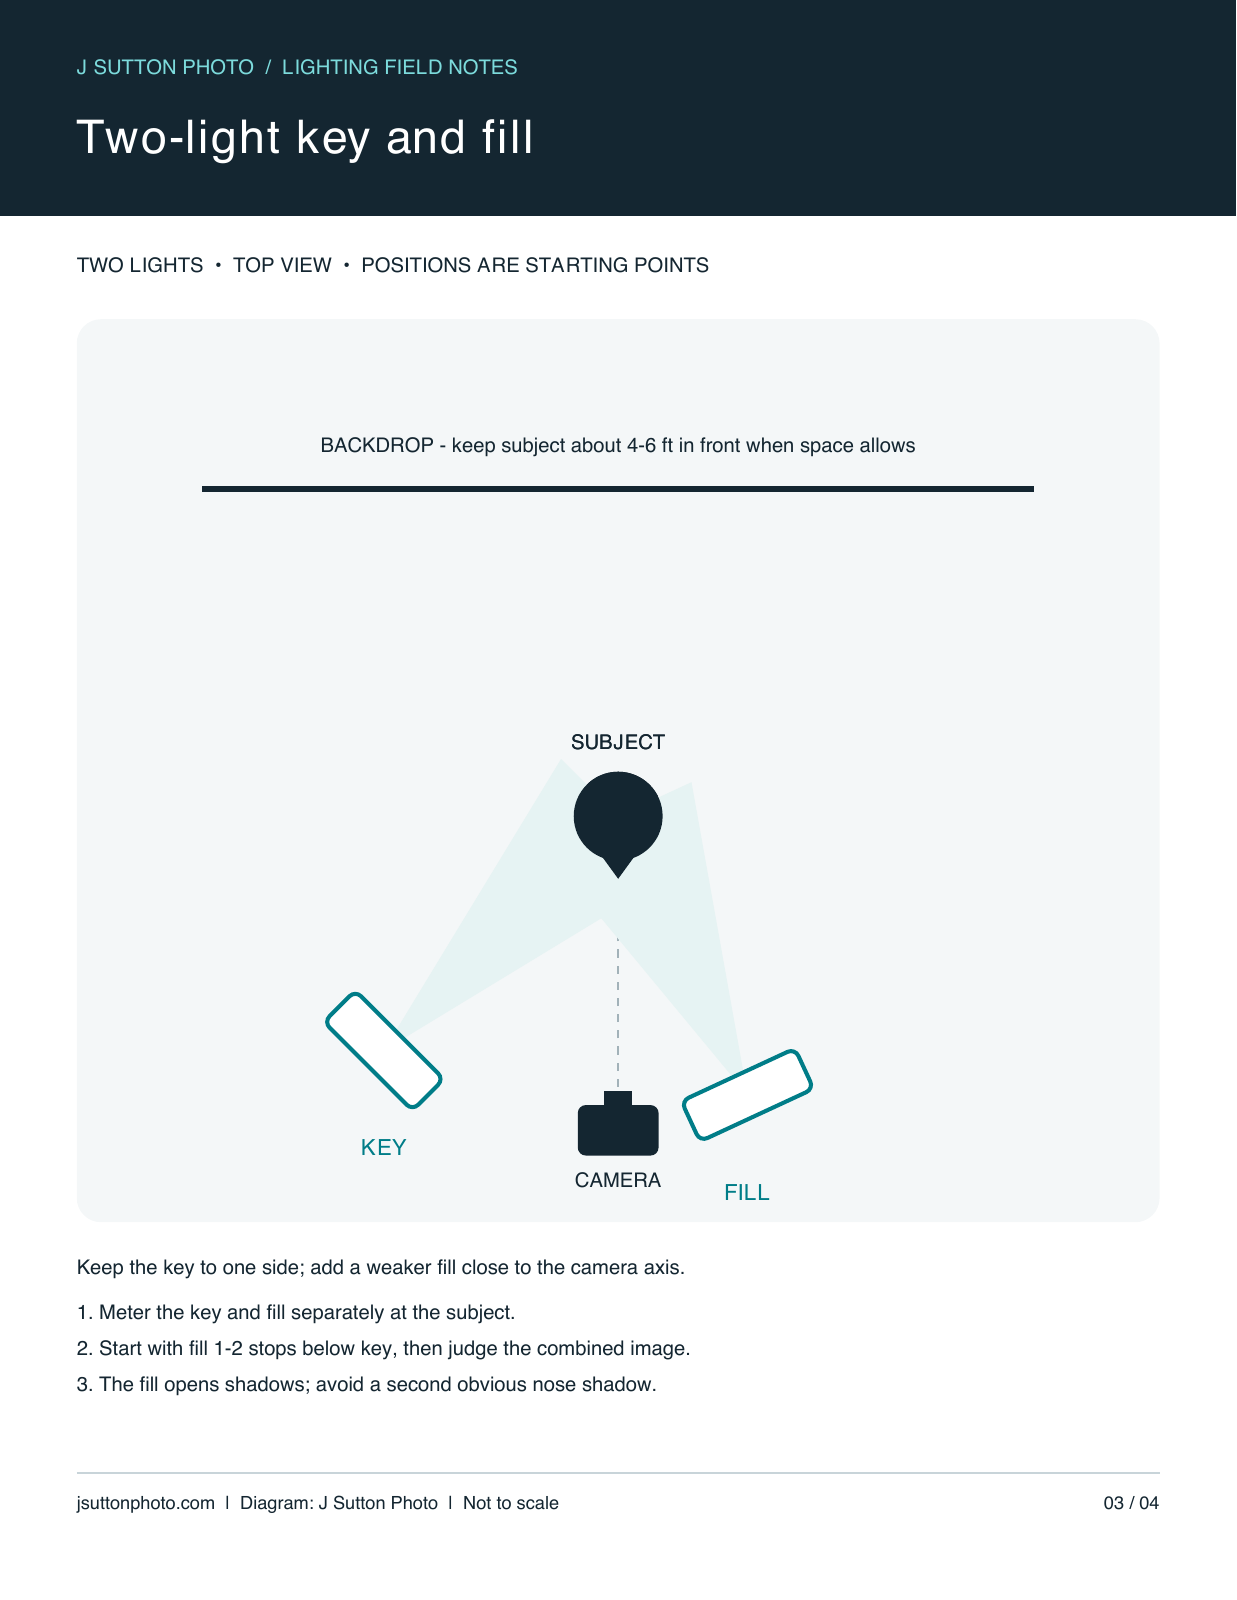
In a key-and-fill portrait setup, the key light establishes the face’s shape and the fill light controls how dark the shadows appear. Place the key to one side, then add a weaker, broad fill near the camera axis. The goal is readable shadow detail while preserving the direction created by the key.
This third lesson in the J Sutton Photo lighting series adds a second powered light to the one-light loop setup. It is useful when you want consistent, approachable headshots across people with different face shapes, clothing, and positions.
Download the lighting diagram

Download the printable lighting diagram (PDF) · Download the diagram image (PNG)
Portrait reference: what to look for

Give each light one job
The key is the main source. Keep its direction and height intentional: roughly 30-45 degrees to one side is a useful starting point. The fill should not introduce a competing, obvious shadow. A soft source close to the camera’s line of sight can lift the shadow side more evenly.
A fill light is different from a rim or background light. Fill changes facial contrast. A rim outlines an edge, while a background light changes the backdrop. Decide which problem you need to solve before adding equipment.
Set the key and fill step by step
- Switch off the fill. Build a one-light portrait you like. Set the key’s position, softness, and exposure first.
- Place the fill. Put a soft source near the camera axis and clear of the lens. Keep the stand secure and avoid obstructing your subject’s movement.
- Measure separately. With an incident flash meter at the subject, fire each source on its own. Start with the fill reading one or two stops below the key.
- Turn both lights on. Meter or test the combined illumination. Light adds together, so the final exposure may need adjustment.
- Judge the photograph. Look at the cheeks, eye sockets, and jaw. Increase fill if the shadows feel too heavy; reduce it if the portrait loses shape.
What does one stop below the key mean?
If the key alone meters f/8, a fill reading of f/5.6 is one stop lower and f/4 is two stops lower, using the same ISO. These are isolated source readings at the subject, not promises of a particular final bright-side-to-shadow-side ratio. Modifier spill, room bounce, and the overlap of both sources affect that final contrast.
Matching the power numbers on two flash units does not guarantee matching illumination. Distance, modifier efficiency, and angle matter. A small flash near the face can contribute more than a larger one farther away.
No flash meter? Use a controlled test
Keep manual camera settings fixed. Photograph the key alone, fill alone, and both together. Compare the shadow detail and highlight clipping using the histogram, highlight warning, and a calibrated display when available. Start with low fill power and raise it in small steps. Judge the combined image rather than assigning an exact ratio from the flash display.
Common key-and-fill problems
Two nose shadows: move the fill closer to the camera axis, soften it, or reduce its contribution. Flat skin and weak shape: lower the fill. Uneven results across a team: mark the subject and stand positions, keep distances consistent, and check exposure when someone changes position.
Glasses may reflect either source. Check both lights separately to identify the cause before moving everything. Also watch for different color temperatures: use compatible sources or correct them with appropriate gels, then set a consistent white balance.
Practice: make a fill series
Keep the key, camera, and pose unchanged. Make a key-only frame, then several frames with increasing fill. Choose the darkest shadows that still communicate the mood and detail you want. More fill is not automatically better; consistency and intention matter more than an arbitrary number.
Can a reflector replace the fill light?
Often, yes. A reflector can lift shadows with one powered light, but its effect depends on the key and its position. A second flash offers independent control when room conditions or repeatability require it.
Explore San Diego headshot photography for individuals and teams, including studio and on-site options.